
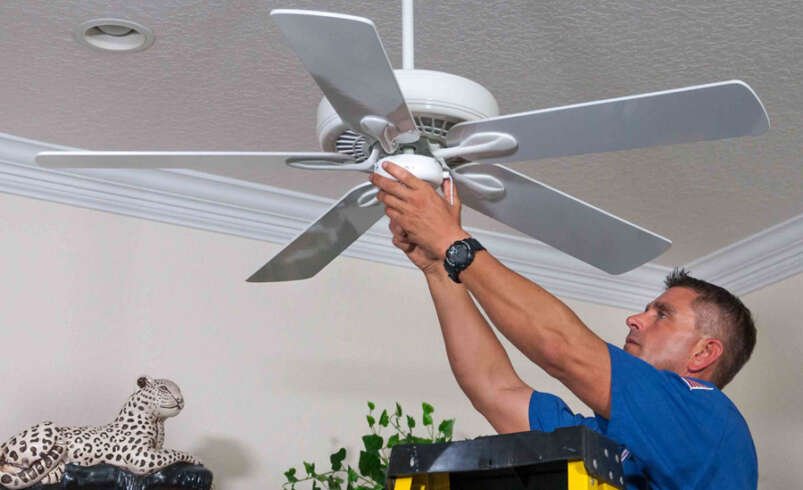

A ceiling fan improves comfort, supports air circulation, and helps reduce energy use throughout the year. It keeps rooms cooler during warm months and helps move warm air during colder seasons when the blade direction changes. Proper ceiling fan installation in Las Vegas, NV also improves safety, performance, and long term reliability.
Many homeowners choose to install ceiling fans in bedrooms, living rooms, kitchens, patios, and home offices. A correctly installed fan operates smoothly, stays balanced, and delivers steady airflow. Understanding the installation process helps you make informed decisions whether you plan to hire a professional or replace an existing fan.
Why Ceiling Fan Installation Matters?
A ceiling fan does more than move air. It creates a more comfortable indoor environment while reducing the need to rely on heating and cooling systems. This can lower energy costs over time.
Proper installation also protects your home. A fan must attach securely to a ceiling box that supports its weight and movement. Loose mounting or incorrect wiring can create safety hazards and reduce the fan’s lifespan.
Homeowners also benefit from a professional appearance. A well installed ceiling fan fits the room, works quietly, and adds value to the space.
Benefits of Installing a Ceiling Fan
A ceiling fan offers several practical advantages for homeowners.
- It improves indoor comfort by creating steady airflow throughout the room.
- It helps reduce heating and cooling costs when used with your HVAC system.
Many modern ceiling fans also include built in lighting, remote controls, smart home compatibility, and multiple speed settings. These features improve convenience while enhancing the room’s appearance.
Choosing the Right Ceiling Fan
Selecting the right fan depends on the room size, ceiling height, and intended use. A fan that is too small will not circulate enough air. One that is too large may overwhelm a smaller room.
Blade span is one of the most important factors. Small rooms often work well with fans around 36 to 44 inches. Medium sized rooms typically need fans between 44 and 52 inches. Larger spaces may require fans with blade spans of 54 inches or more.
Ceiling height also affects installation. Standard ceilings usually need a flush mount or standard downrod. High ceilings often require longer downrods to position the fan at the proper height for effective airflow.
Outdoor areas require fans designed specifically for damp or wet conditions. Indoor models should never be installed outside.
Preparing for Ceiling Fan Installation
Preparation helps ensure a smooth installation process. Before beginning, turn off power at the electrical panel and verify that electricity is off with a voltage tester.
Inspect the existing electrical box. A standard light fixture box may not support the weight and movement of a ceiling fan. Replace it with a fan rated electrical box if necessary.
Gather all required tools before starting. Common tools include screwdrivers, wire strippers, pliers, a ladder, electrical tape, and a voltage tester.
Read the manufacturer’s instructions carefully because installation steps can vary slightly between models.
Steps in Ceiling Fan Installation
The installation process follows a series of important steps that ensure safe operation.
First, install the ceiling fan mounting bracket securely to the fan rated electrical box. This bracket supports the entire fan assembly.
Next, assemble the fan according to the manufacturer’s instructions. Some fans require attaching the downrod before mounting while others use a flush mount design.
Connect the electrical wires by matching the corresponding wire colors. Secure each connection with wire connectors and carefully tuck the wires into the electrical box.
Mount the fan motor onto the bracket. Install the fan blades one at a time while tightening all screws evenly. If the fan includes a light kit, connect and install it after securing the motor.
Restore power after completing the Ceiling Fan Installation. Test every fan speed and lighting function to confirm proper operation.
Common Ceiling Fan Installation Challenges
Some installations present additional challenges depending on the home’s construction and electrical system.
Older homes may contain outdated wiring that requires upgrades before installing a new fan. Some ceilings may also need additional structural support.
Vaulted ceilings often require angled mounting kits that keep the fan level during operation. Extra high ceilings usually need longer downrods to position the blades at an effective height.
Large rooms sometimes require more than one ceiling fan for balanced airflow. Proper placement ensures even air circulation throughout the space.
Ceiling Fan Safety Tips
Safety should always remain the highest priority during installation.
Every mounting screw should tighten securely. Loose hardware may cause wobbling, noise, or damage over time.
Electrical connections must remain properly insulated inside the electrical box. Exposed wiring creates unnecessary risk.
Keep the fan blades at least seven feet above the floor for safe clearance. Maintain sufficient distance from walls, cabinets, and tall furniture.
Inspect the fan periodically after installation. Tightening loose screws and cleaning dust from the blades helps maintain smooth operation.
Signs You Need Ceiling Fan Replacement
A ceiling fan does not last forever. Certain problems indicate it may be time for replacement instead of repair.
Excessive wobbling often points to worn components or structural issues. Persistent noise can result from aging motors or damaged bearings.
Poor airflow despite correct blade direction may signal declining motor performance. Flickering lights, unreliable controls, or repeated electrical problems also suggest replacement.
Modern ceiling fans provide greater energy efficiency, quieter motors, and advanced features that older models may lack.
Professional Ceiling Fan Installation vs DIY
Some homeowners successfully install ceiling fans themselves when replacing an existing unit with similar wiring. Others prefer professional installation for added safety and convenience.
Professional installers understand electrical codes, proper mounting techniques, and wiring requirements. They can identify hidden issues before they become larger problems.
Professional installation also saves time and reduces the chance of mistakes. Complex projects involving new wiring, high ceilings, or structural modifications often require experienced service.
DIY installation may work well for individuals who have electrical knowledge and the correct tools. Every homeowner should understand local electrical regulations before beginning any work.
Ceiling Fan Maintenance After Installation
Routine maintenance keeps your ceiling fan operating efficiently for many years.
Dust buildup affects both performance and indoor air quality. Clean the blades regularly with a soft cloth to prevent dirt accumulation.
Check mounting screws every few months to ensure they remain tight. Loose hardware can increase vibration during operation.
Balance the fan if wobbling develops. Many manufacturers include balancing kits that correct uneven blade movement.
Lubrication is generally unnecessary for modern sealed motor designs. Always follow the manufacturer’s maintenance recommendations for your specific model.
Factors That Affect Installation Cost
Several factors influence the total cost of ceiling fan installation.
The type of ceiling plays an important role. Standard flat ceilings usually require less labor than vaulted or high ceilings.
Electrical work also affects pricing. Replacing an existing fan typically costs less than installing new wiring or adding a new ceiling box.
Fan size, lighting features, remote controls, and smart home integration may increase installation time. Outdoor installations may also require weather rated equipment and additional preparation.
Requesting a detailed estimate before work begins helps homeowners understand the expected costs and services included.
Conclusion
Ceiling fan installation near you improves comfort, supports better air circulation, and helps reduce energy use throughout the home. Proper installation ensures safe operation, quiet performance, and lasting reliability. Choosing the right fan, preparing the installation area, and following correct mounting and wiring practices all contribute to long term results. Routine maintenance also helps extend the life of your ceiling fan while keeping it operating efficiently.
If you are looking for dependable ceiling fan installation services, Custom Wood Finishes and More is the best company that provides these services in Las Vegas, NV and its surrounding areas. Their experienced team delivers quality workmanship, safe installation, and reliable service for every project.
Frequently Asked Questions
How long does ceiling fan installation take?
Most standard ceiling fan installations take one to three hours. More complex installations that require new wiring or ceiling modifications may take longer.
Can I replace a light fixture with a ceiling fan?
Yes. You can replace a light fixture with a ceiling fan if the existing electrical box is rated to support a ceiling fan. Otherwise, it should be replaced with a fan rated box.
How high should a ceiling fan be from the floor?
The fan blades should remain at least seven feet above the floor for safe and effective operation.
Why does my ceiling fan wobble?
A ceiling fan may wobble because of loose screws, unbalanced blades, improper mounting, or worn components. Inspecting and balancing the fan usually resolves the problem.
Do ceiling fans help lower energy bills?
Yes. Ceiling fans improve air circulation, allowing homeowners to reduce heating and cooling system use while maintaining indoor comfort, which can help lower energy costs.